
Hello!
Before we start I’ll assume you know how to use houdini and how to write python code.
This tutorial requires Houdini 17.5 as we use the new TOP context.
Now creating folders with python and a config file is really easy to do. You can either use a Json or Yaml file to help design the folder structure. Depending where your work or library access you might not have pyyaml installed as it’s not chipped with python or houdini.
I’ll show you first how to simply create a recursive loop in python to use either those two options.
Create Folders with Json/Yaml file
Create Folders with Json/Yaml file:
Ok so let’s first create the directory structure.
import json
import os

# simple folder structure with a dictionary
folders = {}
folders['houdini'] = {"hip": None, "geo": {"bgeo":None}}
folders['maya'] = {"scenes": None}

# saving json file to disk
path = "/path/to/json/file.json"

with open(path, 'w') as f:
    json.dump(folders, f)
Now that we have created the file we need to parse it.
def walk(folderDict, path):
    paths = []

    # we only continue if the value is not None
    if folderDict:
        for folder, subDict in folderDict.iteritems():

            # making sure the path will have forward slashes
            # especially necessary on windows
            pathTemp = os.path.normpath(os.path.join(path, folder))
            pathTemp = pathTemp.replace("\\", "/")

            #add the current found path to the list
            paths.append(pathTemp)

            # we call the the function again to go deeper
            # in the dictionary
            paths.extend(walk(subDict, pathTemp))


    return paths

# opening the previously saved json file
# this is to simulate opening a real config file

folders = {}
with open(path, 'r') as f:
    folders = json.load(f)

rootPath = "/path/to/root/folder"
folderPaths = walk(folders, rootPath)
Now if you print p you should get something like this:
/path/to/root/folder/maya
/path/to/root/folder/maya/scenes
/path/to/root/folder/houdini
/path/to/root/folder/houdini/hip
/path/to/root/folder/houdini/geo
/path/to/root/folder/houdini/geo/bgeo
We finish with creating the directories.
for folder in folderPaths:
    os.mkdir(folder)
So like I said this pretty simple to do.
To do it with yaml. It’s pretty much the same as yaml file will also return a dictionary. But it’s actually easier to create the yaml file as all you need to do is create a file like before with yaml as extension. Then put the folder structure like this:
maya:
  scenes:
    None
houdini:
  hip:
    None
  geo:
    bgeo:
      None
Then use this very similar script to parse the yaml file.
path = '/path/to/yaml/file.yaml'
folders = {}
with open(path, 'r') as f:
    folders = yaml.load(f)
If you run the same code from above you will get the same result.
Let’s do it in Houdini TOPs now!
Ok so we have seen how to create a folder structure from a Json and Yaml file which fairly similar.
But I wanted to see if I could do the same with Houdini TOPs. When I saw there is a node called “Make Directory”
So I started wandering around all the nodes in this new context to see what I could use. There are some nodes to handle Json file. But they don’t really provide an easy procedural way of creating the folders. I wanted to see if I could do it without a Json or Yaml file and being pretty user friendly.
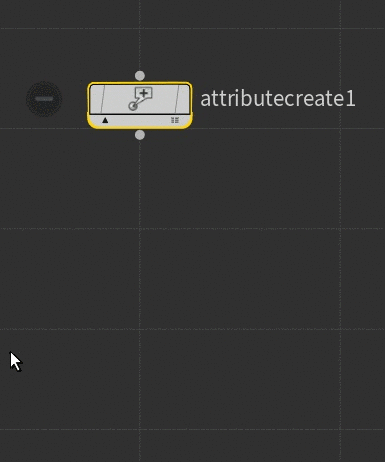
I discovered that node: Attribute Create.
The attribute create allows you to have multiple type of attributes like string, float, integer and result data.
Here will be interested in the string attribute. If I were to create a new one like this:
and cook the node, with right click and “cook selected node” or shift+G, you would see now one work item has been created an hold the attributes as dictionary.
Now obviously we can’t do too much with this. Let’s have a look at the make directory node.

On the node tab you have 2 options only, it’s a make directory node. No need to have more than. The “Use Upstream Index” parm try to be smart and use the node name and item’s index. Which we are not interested in. We want to have a specific name at a specific place.
The “Directory Name“ use a path to the directory. so let’s try it:
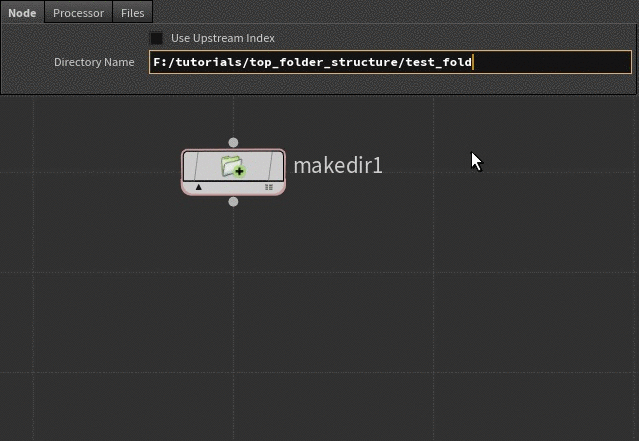
I already created “F:/tutorials/top_folder_structure” but we can see that the folder was successfully created. YAY!
Unfortunately this is not really procedural. let’s see how we can use the attribute create.
let’s rename the attributecreate1 to folder_structure. Clear the attributes and create a new string attribute called path with the same value as before:

When you cook the node you’ll have instead the attribute path with the value F:/tutorials/top_folder_structure/test_folder
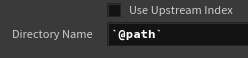
Ok now let’s use it in the make directory node.
Connect the folder_structure node to the makedir node.
Put `@path` in the “directory Name” parm.
Cook the makedir node.

WOO, this more like it! Make sure to remove the directory “test_folder” before so you are sure it works.
We can create a folder using an attribute create, but we have to specify a path. We can definitely improve this and make it a bit more user friendly.
Let’s push this a bit further shall we
How can we make this a bit better. Well I thought maybe we could use the attribute create as a tree structure, with values referencing keys.
We have a key path with a value F:/tutorials/top_folder_structure/test_folder. If we wanted to create multiple folder with this system it would get annoying really quickly.
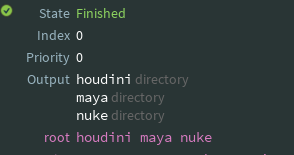
So instead let’s say we have a key root with a value houdini maya nuke ( I don’t like having maya here too, but what can you do…). Now if we split this, we have a list of folders. When we cook this node we will still end up with only one work item as the node does not know we need three. One per folder. The makedir node will only create one folder per work item. That’s the way TOPs work.
We could try to use the feedback loop but that would be way too complicated for what we trying to achieve here.
So we will use a pythonscript node.
Pythonscript nodes allow us to execute a python command per work item or to modify those work items, like adding attributes to them. Which what we going to do.
In the node’s script text field put this code:
# get the root value
rootFolders = work_item.data.stringData("root", 0)

# loop over the root folders and add
# result data to the current work_item


for folder in rootFolders.split():
    # the "directory" value is tag for the result data
    # the 0 is the file checksum.
    work_item.addResultData(folder, "directory", 0)
The script will split the value from root and will add it to the workitem’s result data. This is important so we can use a workItemExpand node. When you middle click on the workitem you should see that:
Houdini will interpret the workItem’s result data a bit differently than an attribute value. Usually this will be a file geometry or a an image path. But we can use it for something else. The workItemExpand node allow us to create multiple workItems based on different values, one of them is to use the result data of a previous workItem. So let’s try it.
Create a workItemExpand node, connect after the pythonScript node and cook it. You have now three workItems. Pretty nice hey.
![Ajye6Spoor[1].gif](https://images.squarespace-cdn.com/content/v1/56ad815a40261d6ca1fc7d4a/1554164687041-SEDMZ8NQI2QKIEDARD73/Ajye6Spoor%5B1%5D.gif)
If you look at the output field on each workItem. You’ll see they all have a different value.
Now let’s put that into the “makedirectory” node in the directory name parm with `@pdg_input`. This will notify the node to use those values we just created. They are output value from the “workitemexpand” node but input values for the “makedir” node.
If you cook this node. It will succeed, but nothing really happened because there is no real path.
We could add the path inside the “pythonscript” node, but it would make it a hard coded value. Which does make it quite reusable.
let’s create a new attribute on the folder_structure node. Pretty much the same as before:
key path and value F:/tutorials/top_folder_structure
We can now get that value in the”pythonscript” node.
# get the root value
rootFolders = work_item.data.stringData("root", 0)

# get the path value
path = work_item.data.stringData("path", 0)

# simple function to create the folder's path
def computePath(path, folder):
    pathTemp = os.path.normpath(os.path.join(path, folder))
    pathTemp = pathTemp.replace("\\\", "/")
    return pathTemp

# loop over the root folders and add
# result data to the current work_item

for folder in rootFolders.split():
    # the "directory" value is tag for the result data
    # the 0 is the file checksum.
    folderPath = computePath(path, folder)
    work_item.addResultData(folderPath, "directory", 0)
I just did a simple function that will be called from the loop to create the path.
As you can see there is “\\\” instead of just “\\” for the usual python way. That’s because houdini evaluate the python script. It tends to fail with only the “\\”.
Now if you run the network you should have folders.
![IDpAfPWCau[1].gif](https://images.squarespace-cdn.com/content/v1/56ad815a40261d6ca1fc7d4a/1554166727621-ZQN23SYY4YSEQPMWZ915/IDpAfPWCau%5B1%5D.gif)
Pretty damn noice hey!
Recursive Folder creation with Attribute Create Node
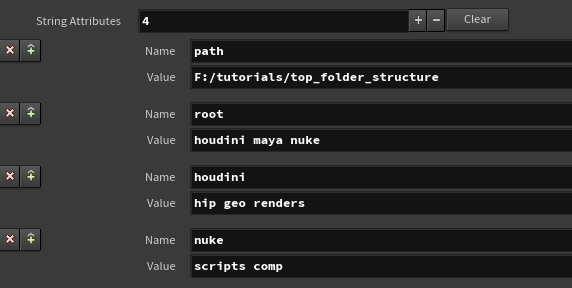
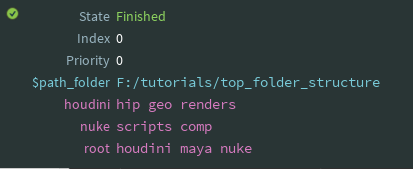
Ok now let’s do the full folder structure creation. We can add a few values to our “folder_structure” node.
Like this:
We have seen above how to recursively get the values from a dictionary. Let’s apply the same principle here. Create a new “pythonScript” node, to replace the other one.
Unfortunately, recursive code inside the node itself does not seem to work. The node will error saying it can’t the function just define above… But we can have that code in a separate file and does the trick.
I will create an empty file find_folders.py inside the root directory F:/tutorials/top_folder_structure
with the code:
import os


# simple function to create the folder's path
def computePath(path, folder):
    pathTemp = os.path.normpath(os.path.join(path, folder))
    # no need to have "\\\" inside a separate file
    pathTemp = pathTemp.replace("\\", "/")
    return pathTemp


def walk(all, folderName, previousPath, paths):

    # get the subfolders if any
    subFolders = all.get(folderName, None)
    if subFolders:
        subs = subFolders[0].split()
        for s in subs:
            # expand the path
            subPath = computePath(previousPath, s)
            # append to the list of paths
            paths.append(subPath)
            # continue down the dictionary
            walk(all, s, subPath, paths)

def main(rootPath, allFolders):

    """
        the rootPath is the directory root where
        to create the folders
        the allFolders is the dictionary of the workItem's data

    """

    # get the root folders
    rootFolders = allFolders.get("root", None)

    paths = []
    if rootFolders:
        roots = rootFolders[0].split()
        for r in roots:
            # expand the path
            subPath = computePath(rootPath, r)
            paths.append(subPath)
            # get all the subfolders
            walk(allFolders, r, subPath, paths)

    return paths
And with this code inside the pythonScript node:
import sys
path = work_item.data.stringData("path", 0)

# we happen the path to sys so python
# can find the python file
if not path in sys.path:
    sys.path.append(path)

import find_folders

# work_item.data.allDataMap will a dictionary
# with all the attribute keys and values
paths = find_folders.main(path, work_item.data.allDataMap)

for i in paths:
    work_item.addResultData(i, "directory", 0)
If you cook the node you should have something like this:
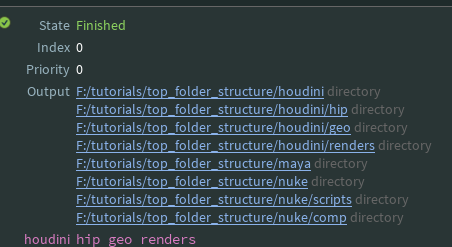
Connect this pythonScript to the itemWorkItem instead of the other one. And cook the makeDir node. Like that
![82Ow48nhpF[1].gif](https://images.squarespace-cdn.com/content/v1/56ad815a40261d6ca1fc7d4a/1554168681166-WL06967EKAV2ITS068OQ/82Ow48nhpF%5B1%5D.gif)
Woohoo! we have create a folder structure. However you might sometime get something like
![7oYdOAlE7X[1].gif](https://images.squarespace-cdn.com/content/v1/56ad815a40261d6ca1fc7d4a/1554168801250-8FW88BF71XCWDIQ299D3/7oYdOAlE7X%5B1%5D.gif)
This is because houdini tries to create all the directories at the same time. Since the workItems work in parallel. And the makeDir node internally uses the function os.makedirs() which already recursively create all the needed parent folders for a folder.
We can implement a function that will keep only the child folders. Replace the pythonScript code with this:
import sys
path = work_item.data.stringData("path", 0)

# we happen the path to sys so python
# can find the python file
if not path in sys.path:
    sys.path.append(path)

import find_folders

# work_item.data.allDataMap will a dictionary
# with all the attribute keys and values
paths = find_folders.main(path, work_item.data.allDataMap)

# only add the path if it's not
# contained into any other ones
# meaning it will be the last child
# of the hierachy

finalPaths = []
for p in paths:
    check = False
    # keep everything except itself
    temp = [ i for i in paths if i != p]
    # compare against all the other paths
    for a in temp:
        if p in a:
            check = True
            break
    if check:
        continue
    finalPaths.append(p)

for i in finalPaths:
    work_item.addResultData(i, "directory", 0)
Now if we run the makeDir node, there should be less work_items and we won’t get any errors.
There you we can now easily create folder structure with the attributeCreate and a few nodes.
Some improvements
Some things that I would like to change is to have the path set from a different node.
Let’s put down an environmentEdit node between folderstructure and pythonScript node. Create a new env variable called path_folder with a value of F:/tutorials/top_folder_structure like so:
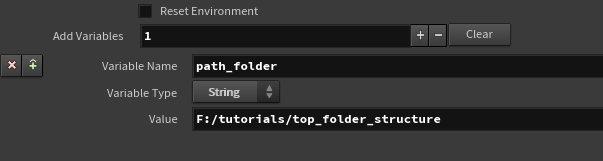
path_folder is now displayed as an env variable
Remove the attribute path from attribute create node and change the code in pythonScript to:
path = work_item.envLookup("path_folder")
#path = work_item.data.stringData("path", 0)
You could also have another env for the python script path. If you put it somewhere else.
The environment node will only give/change env var for the workItems only. Not for the houdini session.
Conclusion
Obviously this might look like kind of convoluted way of creating a folder structure. But it’s really easy to modify and add more to it. Also it’s a pretty good to start learning about a few nodes.
TOPs has some really nice features that are definitely worth checking out. I learned new things by doing this tutorials. Even though I already did the content before.
Hopefully you learned a thing or two too. Here is the hip file and here is the python script with the final result.