Hello!
In this 3 parts tutorial, I’m going to show you how to ingest an asset from decompressing a zip file to submitting a daily to shotgun. This is usually the role of I/O or data wrangle people in VFX companies. Now this going to require some time as the it is quite lengthy. And bare in mind, this is a merely basic introduction to the all process. There are a lot of edge cases and so the idea of fully automating it, is kind of delusional. Still I think it’s a pretty exercise to do and especially with TOPs.
PREREQUISITE:
This tutorial is advanced so I definitely expect you to be familiar with Houdini and coding. As I won’t explain every single move I do. And there is a pretty good amount of coding in python ( nothing too complicated though ).
TERMS:
Work item: I will use this word quite often during these series. A work item is the a job being executed in tops by houdini and hold information that can be parsed, read and used downstream the top network. The work item is shown by a dot, usually green, on the left down side of the node.
Parent Item: This is the direct parent for the current work item. Which is usually coming from input node.
overview:
We will create 3 HDAs in TOPs and 2 HDAs in OBJ.
We will create a small yaml config file.
We will use some of theses TOP nodes in the process:
Environment Edit, python processor, python script, rop fetch, hda processor,
ffmpeg encode video, some shotgun nodes and others.
We will Use Shotgun.
Chapters:
Conform and copy and asset.
3.1 Creating the turntable HDA.
3.2 Assemble and create new paths.
3.3 Creating the turntable Object HDA.
3.4 Rendering the asset.
3.5 Updating conform_asset HDA.
4.1 Setup shotgun: WEb.
4.2 Setup shotgun: houdini/python.
4.3 Creating the shotgun network.
4.3.1 Find project and check version.
4.3.2 Use the version to trigger different graphs.
4.3.3 Gather Information and submit.
4.4 Conclusion.
Create the environment and configs:
Before we jump into putting all the nodes together, let’s create a quick yaml config file. You can put that config file where ever you want. You just need to remember the path for after. You will need to install pyYaml. It’s rather easy to get, so I’ll let you do it on your own. I’m sure you can :)
We still need to add the python path to our environment before we can use it.You should be able to add your python path to houdini with the houdini.env file.
PYTHONHOME = “C:/Python27/Lib/site-packages;&;”
But that does not seem to work. So instead I used the pythonrc.py ( explained here )which is the same the 123.py. Though this one might be disabled by the pipeline. Depending on which company you are at.
Here is the code to add so you can access the library.
import os
import sys

path ="C:/Python27/Lib/site-packages"

if path not in sys.path:
    sys.path.append(path)
just checking the yaml library is available ( Make sure to restart houdini before )
The config file will mainly contain template paths. These paths will be used so the network knows where to put the assets and how to name them.
Ok let’s begin by putting some environment paths:
env:
  root: 'F:/path/to/folder'
  temp_dir: '{root}/processing/tempDecompress'
The root would typically be where you have your projects. Then we will a temp directory for when we unzip or put temp files in. Noted how we have the “{root}” in the “temp_dir” value. This is important if we want to create dependency and not have redundancy in the paths.
Save that file to your desired location, like so:
F:/work/coding/python/tuto/tuto_website/config.yamlAlright let’s read that. With this simple python script to get the configs:
import yaml
configs = {}
path = 'F:/work/coding/python/tuto/tuto_website/config.yaml'
with open(path, 'r') as f:
    configs = yaml.load(f)
We don’t want to have that path in the code so we’ll put in the pythonrc.py as well.
os.environ["PDG_SHOW_CONFIG_PATH"] = "F:/work/coding/python/tuto/tuto_website/config.yaml"
Make sure to use the double quote “ instead of the single quote ‘ for the path value. This might trigger an error in Houdini later. For some weird reason.
Conform and copy and asset:
Initial HDA Setup:
First we create a subnet which we will turn into a digital asset.
Name: ingest_asset Label: Ingest Asset then add those parms to the HDA.
parm types ( in order ): file, ordered menu, string, ordered menu, button, string.
Ok now we want to get the configs with this HDA. The configs parm will allow us to store the configs on the node, so we don’t have to read again the file unless we want to. Limiting hard drive/ network accesses.
Let’s go to the scripts tab and create a new Python Module. Put this code inside:
import os
import yaml

def getConfig(kwargs):

    # current HDA
    node = kwargs["node"]
    # getting the config path set in the environment
    filePath = os.environ["PDG_SHOW_CONFIG_PATH"]

    # default value incase the file does not exists
    configs = {}
    with open(filePath, 'r') as f:
        configs = yaml.load(f)

    # setting the configs dict as an str on the parm
    # since the parm is a string
    node.parm("configs").set(str(configs))
then on the button parm “Get Configs” callback script put this command:
hou.node(".").hdaModule().getConfig(kwargs)
Make sure to change the type to python. Even if by default it’s set to python, change it to Hscript then back to Python.
Cool! that works. Nice and easy.
Ok now, we need to add a few things to the env file:
shows:
  tops:
    asset_categories: [ "Environment", "Prop", "Character", "FX", "Vehicle"]
A list of shows, only “tops” for now and a list of asset categories. We will use it later for constructing a file path and for shotgun.
Save the file and click on the “Get Configs” button to update the parm with the new values.
We just need to display those values on the other parms. Let’s start with the “Show” menu.
Go to the menu tab on the “show” parm and select “Menu Script” like so:
Make sure to have python selected at the bottom for the menu script language. Then put this code in.
import itertools

# get current node
node = hou.node(".")

# get the configs
configStr = node.parm("configs").eval()

# if the value is not empty
if configStr:

    # convert to dict
    config = eval(configStr)

    # get the show list
    showsDict = config.get("shows", {})
    shows = showsDict.keys()
    shows.sort()

    # create a list of list with duplicate values
    # e.g [['tops', 'tops'], ...]
    result = zip(shows, shows)
    # flaten the lists
    # e.g ['tops', 'tops', ...]
    resultFlat = list(itertools.chain(*result))

    return resultFlat
# we always need to return a list
return []
Awesome. We can do the same for the category parm.
import itertools

# get current node
node = hou.node(".")

# get the configs
configStr = node.parm("configs").eval()

# if the value is not empty
if configStr:

    # convert to dict
    config = eval(configStr)

    # get the selected show
    show = node.parm("show").evalAsString()

    # get the asset category list
    assetList = config['shows'].get(show, {}).get("asset_categories", [])
    assetList.sort()

    # create a list of list with duplicate values
    # e.g [['FX', 'FX'], ...]
    result = zip(assetList, assetList)
    # flaten the lists
    # e.g ['FX', 'FX', ...]
    resultFlat = list(itertools.chain(*result))

    return resultFlat
# we always need to return a list
return []
Don’t worry about the delay in the syncing. It’s all good.
Find Asset and copy to temp location:
Now that the UI is setup, we can create the HDA’s content.
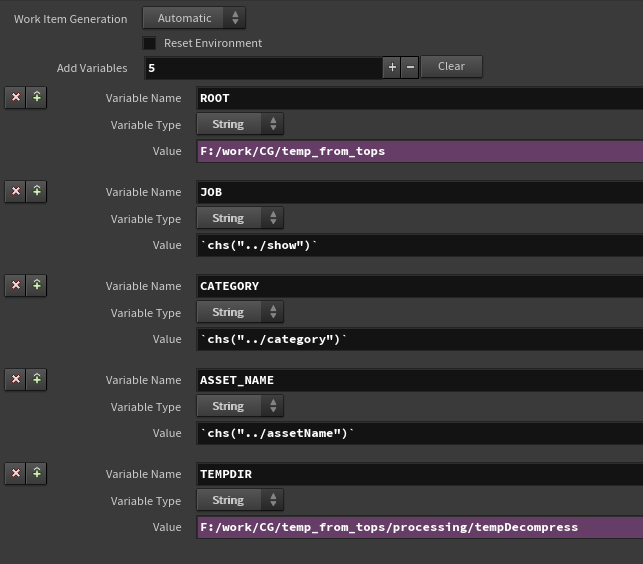
First let’s start by entering those env into the TOPs stream by creating an “Environment Edit” node, and connect it to the input item inside the HDA. Create a few variables as shown in the screen grab below:
JOB, CATEGORY and ASSET_NAME will be coming from the HDA’s UI directly. With parameter reference. But we will need to add some code for grabbing the ROOT and TEMPDIR from the configs.
First let’s add a small function inside the HDA’s python module.
# simple function to retrieve the env from the configs
# code is pretty straight forward
def getEnvs(node):

    parm = node.parm("configs")
    env = {}
    if parm:
        config = eval(parm.evalAsString())
        env = config.get("env", {})

    return env
full HDA’s python module
First python expression for the ROOT variable, on the node parm’s UI:
# get the parent node, here the HDA
node = hou.node("..")
# call the funcion inside the HDA's python module
env = node.hdaModule().getEnvs(node)
# get the root value
root = env.get("root", "")
return root
Then the TEMP_DIR expression:
# get the parent node, here the HDA
node = hou.node("..")
# call the funcion inside the HDA's python module
env = node.hdaModule().getEnvs(node)
# get the root value
root = env.get("root", "")
# get the temp_dir value
temp_dir = env.get("temp_dir", "")
# replace the root key with the root value
temp_dir = temp_dir.replace("{root}", root)
return temp_dir
The temp_dir value has a “{root}” key so we replace that one with the “root” value. You could also grab it from the previous variable, but the order might change if we add or remove some of these. That could break the expression.
Setting the environment variables on the work item.
Alright now that we have this we can proceed to do some work. But first we need an asset to work on. I have used this one from threedscans website. This is a really good website for interesting and heavy models. Which is always better than a torus to test some setups.
After downloading the model. select the zip file from the HDA’s parm “Asset Path”. Then create and append two nodes after the “Environment Edit”. One “File Pattern” and one “Decompress Files” like so:
Copy relative the “Asset Path” parm from the HDA onto the “Glob Pattern” parm of the “File Pattern” node.
On the “Output Folder” from the “decompress_found_zip” node put:
`@TEMPDIR`
That will read the environment var predefined in “setup_env”. Running the node should extract the file into that specified directory:
As you may have noticed the there is no way to specify which file to decompress on the node itself. That’s why we need the “File Pattern” node first in order to pass down the file through the work item. ( This has been updated in the latest houdini release )
Awesome, we are starting to get things in motion. Create a “Python Script” node and connect it after the “File Decompress” node. This node is going to find all the files that were decompressed and we need to copy, and compute the file paths for us. It will also create a bunch of attributes that we will use down the line.
Let’s start with the code that will find all the files:
# we will need os module to get info on the asset file
import os

def conformPath(path, file):
    pathF = os.path.normpath(os.path.join(path, file))
    # Three escape characters
    # One will be removed when houdin "parse" the code
    # the other Two are used by python itself
    pathF = pathF.replace("\\\", "/")
    return pathF

# the directory we extracted the files to
pathExtract = work_item.envLookup("TEMPDIR")

# paths of assets to copy
paths = []
# all the file paths contained in the extracted dir
allPaths = []
# making sure the TEMPDIR is a directory on disk
if os.path.isdir(pathExtract):
    # list of files contained in the dir
    files = os.listdir(pathExtract)
    # put all the found files inside the allPaths list
    # calling the conformPath on each of them
    allPaths = [conformPath(pathExtract,f) for f in files]
    for f in files:
        # getting the file's path
        pathF = conformPath(pathExtract, f)
        # we don't want to copy the folders only
        # the direct files
        if not os.path.isdir(pathF):
            # we get the time of last modification
            filemtime = os.path.getmtime(pathF)
            # we get the extension
            extention = f.rpartition(".")[-1]
            # appending all the gathered info to paths
            paths.append([pathF, filemtime, extention])
I just added the lines
print paths
print allPaths
in order to see the result. Note the “__MACOSX” folder in the “allPaths” variables. This is clearly something we don’t want to ingest in the pipeline and or project.
Ok now we want to compute the new path. We will use a template inside the config file. Add these:
template:
  asset_path: '{root}/{job}/assets/{category}/{asset_name}/{version}'
  asset_geo_path: '{asset_path}/geo/{full_asset_name}.{extension}'
This is basically a small directory structure. With a few variables that will then be replaced when creating the path. This allows some flexibility on the structure and we look for those keys in code. So we don’t have to split by “/”.
config file should look like this:
Add a “configs” ( labelled “Configs") parm on “get_content_and _assemble_path” node and copy relative from the HDA “Configs” parm.
Add this code:
# get the configs and eval them as a dictionnary
configs = eval(self["configs"].evaluateString())
# get the assetName template
assetNameTemplate = configs.get("template", {}).get("full_asset_name", '')

# get some environment variables
values = {}
values['category'] = work_item.envLookup("CATEGORY")
values['asset_name'] = work_item.envLookup("ASSET_NAME")
# set a temp version to the asset
values['version'] = 'v001'

# compute the full asset name based on the template
fullAssetName = assetNameTemplate.format(**values)

# get the assetPath template
assetPathTemplate = configs.get("template", {}).get("asset_path", "")
# get the assetGeoPath template
assetGeoPathTemplate = configs.get("template", {}).get("asset_geo_path", "")

# compute full for the assetGeoPath
# we just combine the asset_path value with the asset_geo_path value
assetGeoPathTemplate = assetGeoPathTemplate.replace("{asset_path}", assetPathTemplate)

# setuping values for the path
pathValues = {}
pathValues['root'] = work_item.envLookup("ROOT")
pathValues['job'] = work_item.envLookup("JOB")
pathValues['category'] = values['category']
pathValues['asset_name'] = values['asset_name']
pathValues['version'] = values['version']
pathValues['full_asset_name'] = fullAssetName

# default export extension
extensionExport = 'bgeo.sc'
We are just reading the configs and pre-computing some variables before fully creating the path.
With the result:
print pathValues
print assetGeoPathTemplate
{'category': 'Character',
'full_asset_name': 'Character_gutenberg_v001',
'asset_name': 'gutenberg',
'job': 'tops',
'version': 'v001',
'root': 'F:/work/CG/temp_from_tops'}
{root}/{job}/assets/{category}/{asset_name}/{version}/geo/{full_asset_name}.{extension}
As you can see, except for the extension, each key as now a value. Cool!
Ok let’s put the rest of the code:
# prepping some variables
assetPaths = []
assetMtime = []
versions = []
newAssetPaths = []
assetNames = []

# we clean the work_items previous output data
work_item.clearResultData()

# for each files found in the extracted directory
for item in paths:

    # getting the path
    p = item[0]
    # getting the last modification time
    mtime = item[1]
    # getting the extension
    extention = item[2]
    # creating the extension
    pathValues['extension'] = extensionExport

    # computing the path with all the values
    copyToPath = assetGeoPathTemplate.format(**pathValues)

    # getting the folder
    copyToFolder = copyToPath.rpartition("/")[0]

    # checking if the folder exists
    # so we update the version number if needed
    if os.path.isdir(copyToFolder):

        # finding the versions parent folder
        allVersionsFolder = copyToFolder.split("/{0}/".format(values['version']))[0]
        # getting all the version folders
        allVersions = os.listdir(allVersionsFolder)

        # we sort and get the last version
        allVersions.sort()
        lastVersion = allVersions[-1]

        # this part is hard coded to what the version string should be
        # not really good in practice but it will do for this
        # tutorial

        # getting the actual version number
        lastVersionNumber = int(lastVersion.replace('v', ''))
        # incrementing that number
        newVersionNumber = lastVersionNumber + 1

        # computing the new version string
        newVersion = 'v{0}'.format(str(newVersionNumber).zfill(3))
        # re-assigning that version string
        values['version'] = newVersion

    # now we can compute the asset name
    fullAssetName = assetNameTemplate.format(**values)

    # which gives everything we need to fully
    # compute it's path
    pathValues['full_asset_name'] = fullAssetName
    pathValues['version'] = values['version']
    newAssetPath = assetGeoPathTemplate.format(**pathValues)

    # we add the path of the asset to copy
    # to the work_item results
    work_item.addResultData(p, "file", int(mtime))

    # we append those values to the variables
    assetPaths.append(p)
    assetMtime.append(int(mtime))
    newAssetPaths.append(newAssetPath)
    versions.append(values['version'])

# we create array attributes on the work_item
# those attributes will be used downstream
work_item.data.setStringArray('filesToRemove', allPaths)
work_item.data.setStringArray('filesToCopy', assetPaths)
work_item.data.setIntArray('filesMtime', assetMtime)
work_item.data.setStringArray('newAssetPaths', newAssetPaths)
work_item.data.setStringArray('versions', versions)

# since the UI has only one asset name
# we just assign one value to a list
assetNames = [values['asset_name']]
work_item.data.setStringArray("assetNames", assetNames)
result of the all script.
Ok we just done the heaviest section for part I. But there are still a few things to do, so bear with me.
We have a bunch of array attributes. These represent each asset that might have been found in the folder or multiple folders. We need to create a work item per asset and assign those attributes respectively.
We will add a “Python Processor” node after the “get_content_and_assemble_path” with the following python code:
# upstream_items is the list of work_items from the
# previous node
for item in upstream_items:
    # we get the list of files to copy
    filesToCopy = item.data.stringDataArray("filesToCopy")
    index = 0
    for f in filesToCopy:

        # we create a new work item per file
        newItem = item_holder.addWorkItem(parent=item, index = index)

        # we assign all the needed values to each
        # individual item based on the index
        newItem.addResultData(f, "file", item.data.intData("filesMtime", index))
        newItem.data.setString("fullAssetPath", item.data.stringData("newAssetPaths", index), 0)
        newItem.data.setString("assetName", item.data.stringData("assetNames", index), 0)
        newItem.data.setString("version", item.data.stringData("versions", index), 0)
        index += 1
Alright, alright. We have a list of work items ( here only one obviously ) that have their “fullAssetPath” attribute. For now the asset is supposed to be “bgeo.sc” file. So we can’t use a simple graph with“Make Directory” and “Copy File” nodes. Because we actually need to convert that file to a bgeo.sc. We will have to use a “HDA Processor” node. But first we will need to create a HDA than can be called by that “HDA Processor” node.
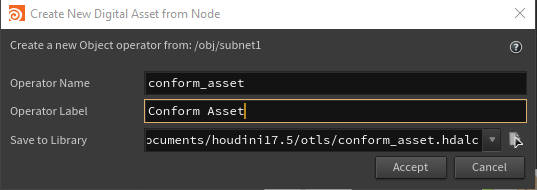
In “/obj” create a “subnet” and make a digital asset.
Hide the “transform” and “subnet” folders and create a “file” type parm with the name “assetPath” and label “Asset Path”.
Create a “File” node inside it. Rename the geo node to “read_asset” and connect the “Asset Path” parm to the “Geometry File” parm.
Right click on the newly created HDA and select “Save Node Type”.
Now go back to the “HDA Processor” then through the “HDA File” parm select the “conform_asset” file.
As you can see we have a direct access of the HDA’s parameters. Which is pretty cool.
Since we added the asset file to copy on the work item’s resultData, we can use the `@pdg_input`
inside the “Asset Path” promoted parm to access the value.
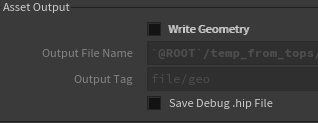
The HDA processor node has a convenient “Write Geometry” option. Let’s use that, if we tick it “ON” and put `@fullAssetPath` inside the “Output File Name” parm. We can now convert the asset and rename it at the same time.
Isn’t this pretty damn amazing!? with a few options and a zip file we get a fully converted, renamed and properly placed asset!
A more advanced conform:
Unfortunately in most places. When you ingest an asset it’s not just for Houdini but also maybe for maya or 3dsmax or others. And a bgeo.sc file does not play really well with these packages. So we will have to use Alembic for that. Which complicate a tad the task, as Alembic require a different export and options in order to be imported back properly.
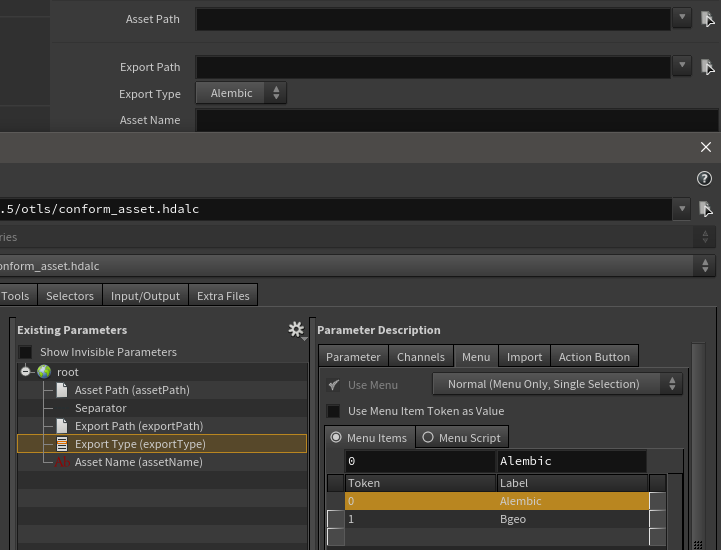
Let’s add some more parameters on the “conform” HDA, not the conform “HDA Processor”.
New parms are:
Export Path: file type
Export Type: ordered menu type
Asset Name: string type
Ok, now we need a few adjustments inside the HDA too.
After to the “File” reader node create this network:
create_path node. VEX code
Go to the “Object” level next to the “read_asset” geo node. And create a “rop” node. Inside create that network:
alembic_export node.
bgeo_export node.
Now connect the “Export Type” parm from the HDA’s UI to both switches. “switch_to_bgeo” and “switch_export_type”.
Use again “Save Node Type” and update the parms on the “HDA Processor” like before. Then put those values:
You can now untick the “Write Geometry”.
We need to use the “Export Type” parm value to drive the extension on the file. Go back to the “get_content_and_assemble_path” node and create another string parm name “exportExtension” and labelled “Export Extension”. Relative copy the “Export Type” from the “conform” node onto that newly created parm.
Just below the line in the script
# default export extension
extensionExport = 'bgeo.sc'
add these lines:
# eval the parm exportExtension
valExportType = int(self['exportExtension'].evaluateString())
# if it's 0 change extension to abc
if not valExportType:
    extensionExport = 'abc'
Even though the option is below. Since there won’t be any animation on it. We can safely query it upstream.
Let’s make a quick change on the parent “ingest_asset” HDA’s UI.
Just promoted the “Export Type” parm from the “HDA processor” to the main UI.
Cool! But small problem now that we don’t use the “Write Geometry” option, we can’t really export anything and there is no way of accessing the rops contained in the HDA. Let’s see what we can do.
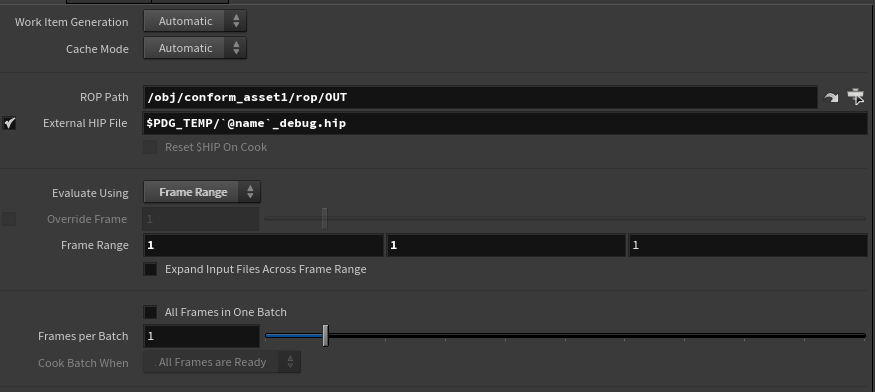
In the list of TOP nodes there is a “ROP Fetch”, have a look a the UI:
The “ROP Path” sounds like something we could use. But we don’t necessarily use the HDA from the scene. Especially since we set to the library on disk…
However, right below it “External HIP File” parm. Which mean it will access the ROP from another file. We don’t have any yet but this looks quite appealing. If only there was a way of creating a hip file on the fly and reference it back, that would do the trick. Alright let’s go back on the “HDA processor”. If you look at the UI again, you’ll see below the “Write Geometry” parm there is “Save Debug .hip File”.
OH WAIT! THIS IS IT!
Ok let’s calm down a bit. We still don’t have a way of finding that file. It does not ask us where to save or create an attribute with the path as the value. With a bit of digging up around the PDG source files I found this:
std::string debug_file_path = temp_dir + "/" + item_name + "_debug.hip";
which mean we can predict what the file will be called.
temp_dir is the variable “$PDGTEMP”, item_name is the name of the work item. It’s not given but we can find it pretty easily and then the rest of the string “_debut.hip”.
Right let’s get to it. After the “conform” node append a “Python Script” and then a “Rop Fetch”. In the python script put this code:
# set the attribute "name" based on the
# parent item's name
work_item.data.setString("name", parent_item.name, 0)
Which basically store the name of the previous work item’s name onto an Attribute. The only missing piece.
If we want to open the scene to check what it looks like. The “$PDG_TEMP” variable is set on the “localscheduler” node. I ususaly change it to “$HIP/pdgtemp” but you can do what you want. Let’s finish with the “ROP Fetch” node.
I got the “ROP Path” by opening the debug file. The “External HIP File” expression comes from just above.
Isn’t it so damn amazing?! We got an Alembic export! And we can see the versioning works since it create a “v002”. This also means we can create Hip files on the fly really easily with a simple HDA. And do a small compute. I really like this! It’s so simple! Damn!
Cool let’s not dwell on this awesome find too long. There still a few things to do in this lesson…
You may have noticed the debug .hip file is quite big. This is because all the nodes inside are locked. So you can really see what you get from the “HDA Processor” node when opening the file. But we don’t care much after the asset is exported to keep it. Let’s put a “Remove File” node after the “export_conformed_asset”. And relative copy the “External HIP File” parm onto the “File Path” parm.
Last part will be the clean up. We need to remove the decompress files as we no longer need them after the export and clean up the work item(s) attributes and result data.
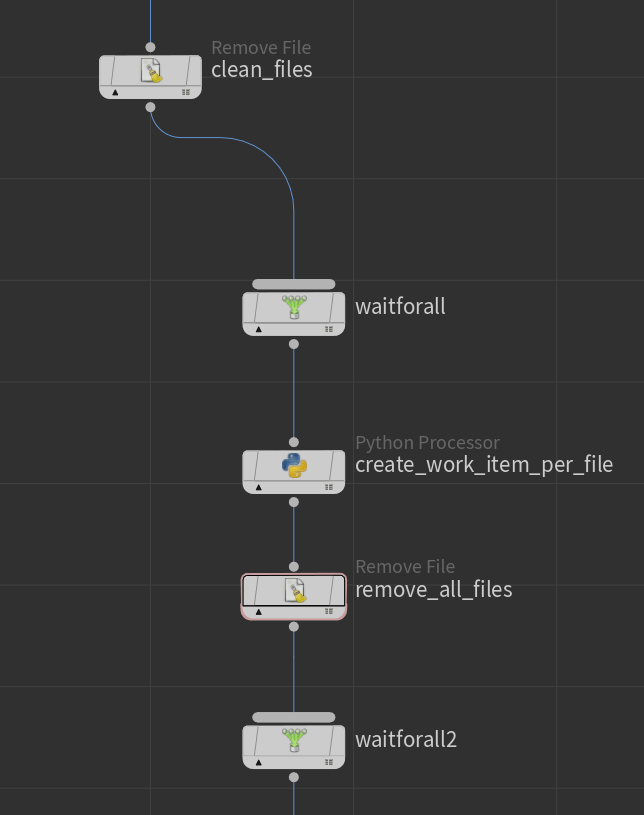
After the clean the “Remove File” node we will create a few nodes:
Wait For All
Python Processor
Remove File
Wait For All
Connect the nodes like above.
The first “waitforall” node will make sure everything is done before we start removing files.
Then we have the “create_work_item_per_file“ that will create new work item based on how many files need to be removed from the temp folder. Here is the python code for the node:
# we will need that for last modified time
import os

allToRemove = []

# looping over the upstream items
# we merge all the list of files to remove
# into one list
for i in upstream_items:

    files = i.data.stringDataArray("filesToRemove")
    allToRemove.extend([ f for f in files if f not in allToRemove])

# foreach file in the main list allToRemove
# we create a work item
# that contains the file as a result data
# ready to be picked up by the following node
for f in allToRemove:
    item = item_holder.addWorkItem()
    mtime = os.path.getmtime(f)
    item.addResultData(f, "file/directory", int(mtime))
Following by “remove_all_files” will remove one file per work item.
remove_all_files UI.
And finally we use another “Wait For All”. Just to make sure we finish everything before continuing.
That’s it for cleaning decompressed files.
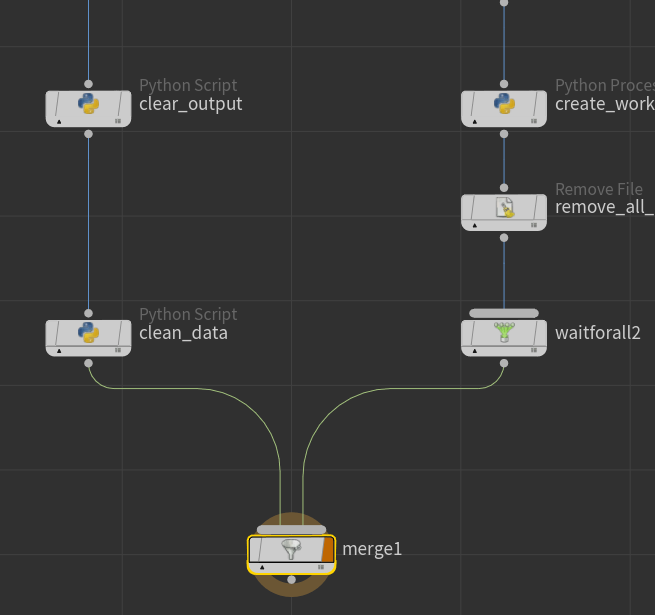
Create two more “Python Script” nodes connected like so:
Then we add a merge an connect the two. The thought of doing the network like this is allowing us to not have to worry too much on what is happening to the work items on the right side. Since we only need to clean some files. We don’t have to try to maintain some attributes or work item number. We just keep that on the left side.
For the first node “clear_output” we put this simple code:
work_item.clearResultData()
Just a simple remove of all result data contained on all work items.
On the second node “clean_data” we going to add one parameter of type file with the name “assetPath” and label “Asset Path” where we going to relative copy the “Asset Path” parm from the parent HDA.
Then will add the following code:
# getting the current asset new name ( per work item )
currentAsset = work_item.data.stringData("assetName", 0)
# getting the list of all assets
allAssets = work_item.data.stringDataArray("assetNames")

# getting the current asset index
currentIndex = allAssets.index(currentAsset)
# using the index to retrieve the corresponding checksum
# a.k.a the last modified time
checksum = work_item.data.intData("filesMtime", currentIndex)

# getting the current version
version = work_item.data.stringData("version", 0)

# getting the newly exported asset path ( per work item )
f = work_item.data.stringData("fullAssetPath", 0)

# we clear everything
work_item.clearResultData()

work_item.data.clearIntData()
work_item.data.clearFloatData()
work_item.data.clearStringData()


# getting the parm assetPath
parm =  self["assetPath"]

# assigning the parm value to a new attribute
work_item.data.setString("inputAssetPath", parm.evaluateString(), 0)

# assigning the saved values to new attributes
work_item.addResultData(f, "file/dir", checksum)
work_item.data.setString("assetName", currentAsset, 0)
work_item.data.setString("version", version, 0)
Boom! done! Well almost…
Cooking the merge will produce two work items. One or more from left and one from right ( duh…)
But we don’t want that. As I said before the we just want the right branch to do something in parallel but we don’t care about passing anything down the stream. There are no nodes that can prevent a work item to be passed down the stream. Or none that I know of. But I think a pretty good work around with minimal effort.
If you create a “Python Processor”, the node expect to have a script that will create new work items. Compared to the “Python Script” that uses and modifies the incoming items. So if we put down a “Python Processor” after the second “Wait For All” node with no code inside we will get this:
Voila! isn’t this pretty damn cool! We can now take a zip file and copy/export it in the correct location, while still be able to choose a file format and asset type! Alright so this concludes the first part of these series. Not too bad hey…
coming up next: Part II


![K0mECtuGpL[1].gif](https://images.squarespace-cdn.com/content/v1/56ad815a40261d6ca1fc7d4a/1559440714787-Y1IITHQM2UYFSAU6KY4R/K0mECtuGpL%5B1%5D.gif)

![ASUX4K5pei[1].gif](https://images.squarespace-cdn.com/content/v1/56ad815a40261d6ca1fc7d4a/1559447386227-80QZK5USE41MZ4FM6JS7/ASUX4K5pei%5B1%5D.gif)
![rJMBf6kU2E[1].gif](https://images.squarespace-cdn.com/content/v1/56ad815a40261d6ca1fc7d4a/1559462817132-QZMFMX3TA8KFEHYQ83K6/rJMBf6kU2E%5B1%5D.gif)




![Y2a2Idczfv[1].gif](https://images.squarespace-cdn.com/content/v1/56ad815a40261d6ca1fc7d4a/1560065503182-RPR7TASZ506SU22AMZK6/Y2a2Idczfv%5B1%5D.gif)
![FLD9vpP8zU[1].gif](https://images.squarespace-cdn.com/content/v1/56ad815a40261d6ca1fc7d4a/1560066146570-J1HWF52NAZZQ18C7EAWT/FLD9vpP8zU%5B1%5D.gif)
![GuCBxqo0qx[1].gif](https://images.squarespace-cdn.com/content/v1/56ad815a40261d6ca1fc7d4a/1560127788581-PKVJ3NN24BUP1XVKG9VB/GuCBxqo0qx%5B1%5D.gif)


![oRE0alShMI[1].gif](https://images.squarespace-cdn.com/content/v1/56ad815a40261d6ca1fc7d4a/1560137752401-TGZXANXH2PNPRA5988SL/oRE0alShMI%5B1%5D.gif)

![9pAdHo2oTd[1].gif](https://images.squarespace-cdn.com/content/v1/56ad815a40261d6ca1fc7d4a/1560140188258-YYTEN4Q9QRMV1XWJRUQA/9pAdHo2oTd%5B1%5D.gif)
![Gk6xT7Db2w[1].gif](https://images.squarespace-cdn.com/content/v1/56ad815a40261d6ca1fc7d4a/1560140655750-GYRLWV6CCTN96PGX8YCJ/Gk6xT7Db2w%5B1%5D.gif)
![8WAp9N828A[1].gif](https://images.squarespace-cdn.com/content/v1/56ad815a40261d6ca1fc7d4a/1560141185351-HIQJCE93WKCB9R6VUJ82/8WAp9N828A%5B1%5D.gif)


![NvaVteyQMp[1].gif](https://images.squarespace-cdn.com/content/v1/56ad815a40261d6ca1fc7d4a/1560228426353-I6383YSD4AEMGAWH6MU1/NvaVteyQMp%5B1%5D.gif)

![iaatqCzY3A[1].gif](https://images.squarespace-cdn.com/content/v1/56ad815a40261d6ca1fc7d4a/1560322812569-S3S2XRS1NXLS3QJ35DL7/iaatqCzY3A%5B1%5D.gif)

![pLxqP2sHuH[1].gif](https://images.squarespace-cdn.com/content/v1/56ad815a40261d6ca1fc7d4a/1560324128923-4SOUKOKU1BQY3Q54BX9R/pLxqP2sHuH%5B1%5D.gif)
![XddKjExTAK[1].gif](https://images.squarespace-cdn.com/content/v1/56ad815a40261d6ca1fc7d4a/1560324239299-TECRHBACVY5Q0S5AZQOE/XddKjExTAK%5B1%5D.gif)
![1lcGOIihjE[1].gif](https://images.squarespace-cdn.com/content/v1/56ad815a40261d6ca1fc7d4a/1560324744142-BCN6SV2IU9M4S34IW1CK/1lcGOIihjE%5B1%5D.gif)
