
Hello!
Welcome to the Ingest Asset tutorial part II.
In this section will look into how do a turntable of the asset we just exported. Since we covered a lot of ground in the previous one. It should be fairly straight forward.
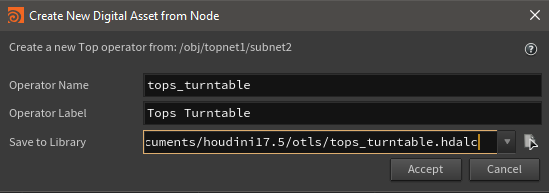
Creating the turntable HDA:
First let’s create a new HDA in the graph from a subnet:
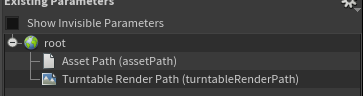
With these parameters:
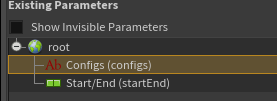
Configs is a string and startEnd is a integer vector 2. And make sure that it has at least one input ( this is set in the “basic” tab)
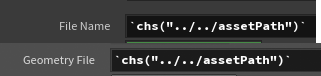
Let’s link the configs from the previous HDA to this one.
`chs("../ingest_asset/configs")`
Note that you could also implement a configs reader on this HDA the same way we did it on the Ingest HDA.
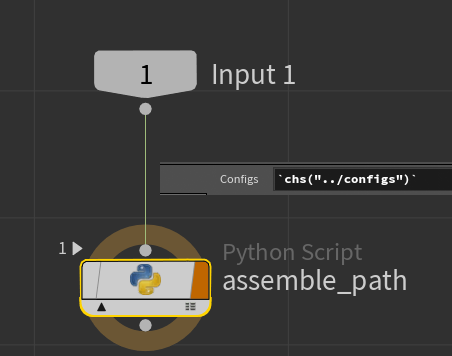
Assemble and create new paths:
Ok we will do a bit of prep on the work item. This will drive the rest of the HDA.
We create a “Python Script” node and connect it to the HDA’s input item. Add also“configs” parm on it. And link the parent “configs” parm to this one.
Before we put some code. We need to update the config file and add one line just below “asset_geo_path” key:
turntable_render_path: '{asset_path}/turntable/{full_asset_name}_turntable{frames}.{extension}'
Now to the code:
# evaluting the configs parm
configs = eval(self["configs"].evaluateString())

# getting the assetName template
assetNameTemplate = configs.get("template", {}).get("full_asset_name", '')

# getting the assetPath template
assetPathTemplate = configs.get("template", {}).get("asset_path", "")

# getting the assetRenderPath
assetRenderPathTemplate = configs.get("template", {}).get("turntable_render_path", "")

# replacing the assetPath template key with the value
assetRenderPathTemplate = assetRenderPathTemplate.replace("{asset_path}", assetPathTemplate)

# creating a few values
values = {}
values['category'] = work_item.envLookup("CATEGORY")
values['asset_name'] = work_item.envLookup("ASSET_NAME")
values['version'] = work_item.data.stringData('version', 0)

# computing the assetName from those values
fullAssetName = assetNameTemplate.format(**values)

# creating the values for the assetPath template
pathValues = {}
pathValues['root'] = work_item.envLookup("ROOT")
pathValues['job'] = work_item.envLookup("JOB")
pathValues['category'] = values['category']
pathValues['asset_name'] = values['asset_name']
pathValues['version'] = values['version']
pathValues['full_asset_name'] = fullAssetName
pathValues['extension'] = 'exr'

# it is necessary to escape the '$' sign or it will be
# evaluated
pathValues['frames'] = '.\$F4'

# computing the renderPath
renderPath = assetRenderPathTemplate.format(**pathValues)

# assigning the renderPath to the work item's data
work_item.data.setString("renderPath", renderPath, 0)


# cloning input data to resultData so we don't loose it
for res in work_item.inputResultData:
    work_item.addResultData(res[0], res[1], res[2])
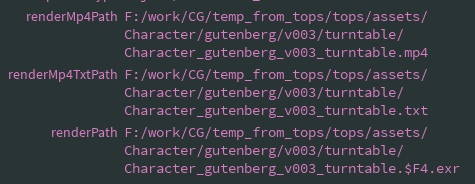
When cooking you should see the full computed “renderPath” attribute:
![cu0K1nqSPc[1].gif](https://images.squarespace-cdn.com/content/v1/56ad815a40261d6ca1fc7d4a/1560637425903-LPW765E0MFC3ZG41NIRI/cu0K1nqSPc%5B1%5D.gif)
As you can see, it follows the version number computed by the previous HDA. So everything goes into the same place. Nice!
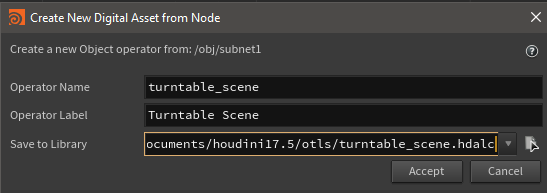
Creating the turntable Object HDA:
Now that we have the computed path, we need a HDA that will render our turntable, the same way we created the “Conform Asset” HDA.
Let’s create it! In “/obj” create a digital asset from a subnet:
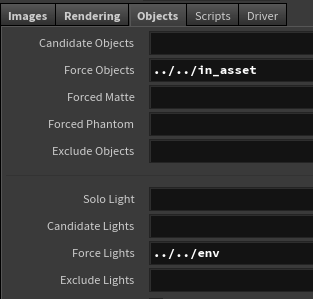
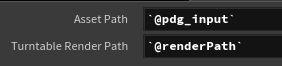
Then add a string parm “assetPath”. And a file-image parm “turntableRenderPath”.
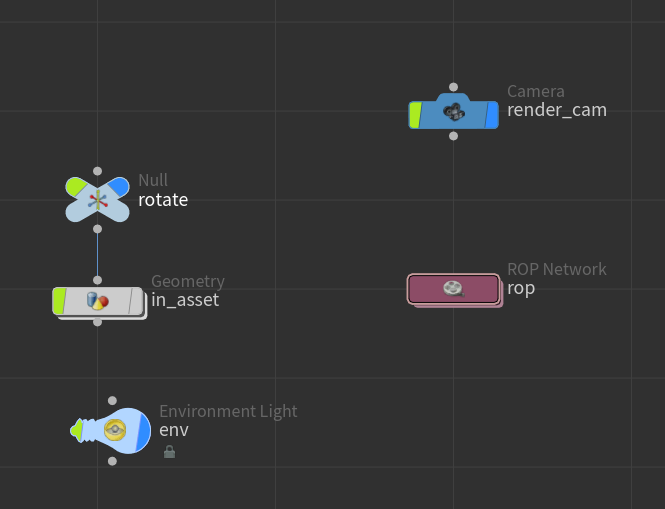
The HDA is quite simple, it contains:
1 geometry node to read the asset ( bgeo or alembic ).
1 environment light.
1 camera.
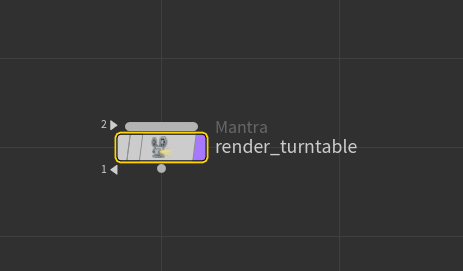
1 rop network with one mantra rop.
on /obj level
Inside the “in_asset” geometry node.
Inside the “rop” network node.
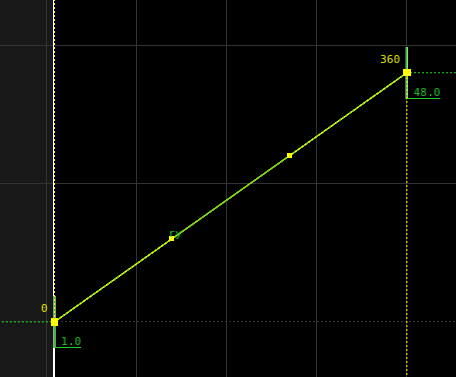
On the “rotate” null node create a linear animation on the Y rotate axis. from 0 to 360 in 48 frames.
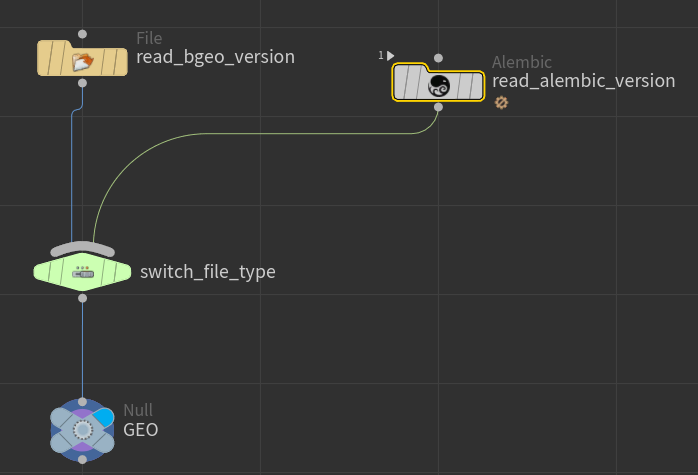
For each reader relative copy the “assetPath” parm:
Alembic and bgeo readers.
Set the load mode on the bgeo reader to “Pack Disk Primitive” instead of “All Geometry”.
On the env light just tick on “Enable Sky Environment Map” in the “Sky Environment Map” tab.
On the camera set the resolution to HDTV ( third preset in the list ). And the xyz transform to 0 1 6 respectively. So it’s kind of above the grid and a bit far back.
For the “mantra” rop node upate the parms as shown below:
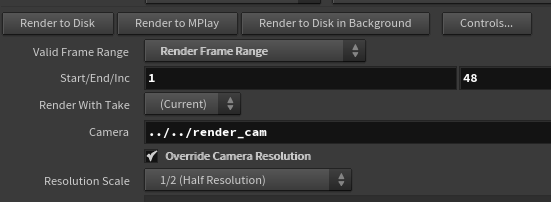
Start/End will be overridden later.

Alright! the HDA is done! now back to tops.
RendEring the asset:
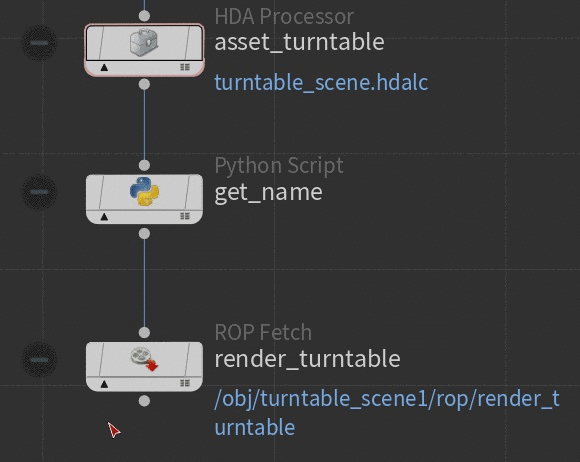
Create a “HDA Processor” node and connect it below the “assemble_path” node.
Select the “turntable_scene.hda” file in the “HDA File” parm. Then update the parms:
![mVLBh71BXu[1].gif](https://images.squarespace-cdn.com/content/v1/56ad815a40261d6ca1fc7d4a/1560640777937-PQNBKK6ZJ2TIJ698MO8T/mVLBh71BXu%5B1%5D.gif)
The same we did it before, make sure to uncheck “Write Geometry” and check “Save Debug .hip File”.
In “HDA Parameters” tab put those expressions:
Before we compute this. Let’s add the remaining two nodes:
1 “Python Script” to get the hip name.
1 “Rop Fetch” to do render.
In the “Python Script” code section put:
# set the attribute "name" based on the
# parent item's name
work_item.data.setString("name", parent_item.name, 0)
And here is the parm values for the “Rop Fetch” node:
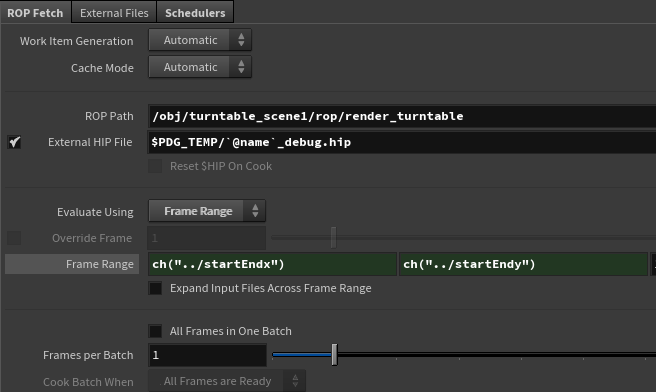
I won’t stay on this, as it has been explained in the previous part.
Let’s set the frame range to start 1 and end 1. Just to see if it works.
Did not show the render. Too long :)
After waiting for a bit you should have gotten one image.

Does not really look like what we expected to see. Well that’s because the asset was not entirely conformed before being exported.

As you can see the asset is aligned in Z and is actually quite huge. So the camera was rendering from inside the asset…
We need to go back to the conform asset HDA and change a few things before export.
Updating conform_asset HDA:
On the “conform_asset” UI you can set the exported bgeo file as the “assetPath” parm value and Use an Alembic reader following by an unpack. This is for implementation and debugging.
Inside the “conform_asset/read_asset” node, put down a “Reverse” node. When loading that model it comes with primitives inside out.
![GdHq8VB2fm[1].gif](https://images.squarespace-cdn.com/content/v1/56ad815a40261d6ca1fc7d4a/1560647873629-QVYDZ52XSRUUFJVFH6LX/GdHq8VB2fm%5B1%5D.gif)
Add a subnet. Inside we will compute a simple matrix in order to re orient the model.
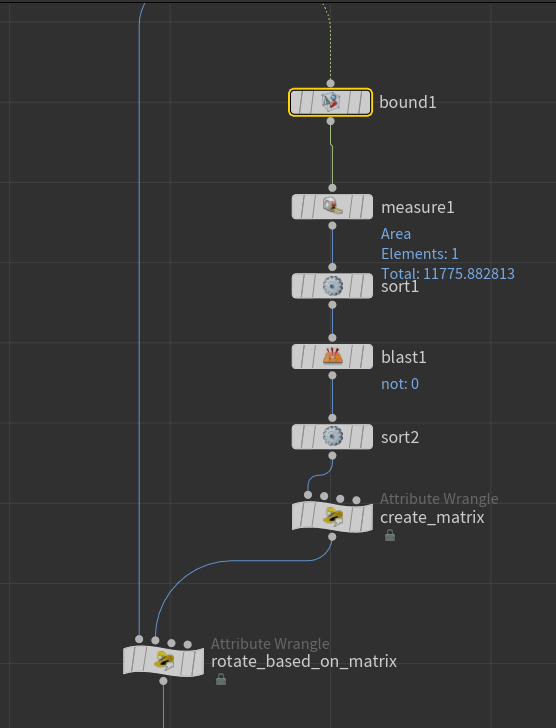
I won’t go and elaborate on the details of that network. It’s not really the purpose of that tutorial. But basically:
We create a bounding box. With “bound” and “Oriented Bounding Rectangle” “on”.
We check which prim is the largest and sort in that order.
We only keep the largest prim, and compute the matrix from that face. It’s pretty easy since the box is always rectangular. No need to do too many cross products except for the Z axis.
We apply that inverted matrix to the geo.
The bound node is default. The “Oriented Bounding Rectangle” had to be turned “off” for producing incorrect result. Should be “on” on most cases though.
The measure sop is default.
The first sort is using the “area” attribute and has “Reverse Primitive Sort” checked.
The blast is set to 0 on primitives with “Delete Non Selected” “on”.
The second sort has “By Vertex Order” set on the “Point Sort” parm.
Here is the vex code for the “create_matrix” wrangle, and is set to details:
// getting all points posittions
vector p0 = point(0, "P", 0);
vector p1 = point(0, "P", 1);
vector p2 = point(0, "P", 2);
vector p3 = point(0, "P", 3);

// computing vectors
vector x = p3 - p0;
vector y = p1 - p0;

// checking the values
// making sure y is the longest
// otherwise interchange
if(length(x) > length(y))
{
    vector temp = y;
    y = x;
    x = temp;
}

// creating normalized vector
// and computing Z
vector xNorm = normalize(x);
vector yNorm = normalize(y);
vector zNorm = normalize(cross(x,y));


// creating the matrix based on those
// vectors
matrix3 m3 = set(xNorm, yNorm, zNorm);
matrix m = matrix(m3);

// moving the matrix based on pivot position
translate(m, p0);
// exporting the result matrix
4@m = m;

// vector export for debugging
v@x = xNorm;
v@y = yNorm;
v@z = zNorm;
And here the code on the last wrangle:
// reading the matrix
matrix m = detail(1, "m");
// applying the inverted result
@P *= invert(m);
![Jplr8X0j2t[1].gif](https://images.squarespace-cdn.com/content/v1/56ad815a40261d6ca1fc7d4a/1560649207280-1OING9EZ97A8F3YDS7UN/Jplr8X0j2t%5B1%5D.gif)
Alright nice. we just need to scale it down to fit in the camera.
After the subnet create a transform. In the scale transform put that expression:
1/(bbox(0, D_YSIZE)/2.1)
This expression is not really procedural. But that would do for the tutorial.
Put another transform down after. We will use that one to centre the model.
Put those expression in the translate parms:
-centroid(0, 0)
-centroid(0, 1)+bbox(0, D_YSIZE)/2.0
-centroid(0, 2)
X Y and Z axis respectively.
View from the render_cam
And Finally add a “Normal” node with default settings.
The network should look like this:

Apply the changes to the HDA. And re-run the the “Ingest_asset” HDA. This will create a proper asset this time. We should be at “v003”.
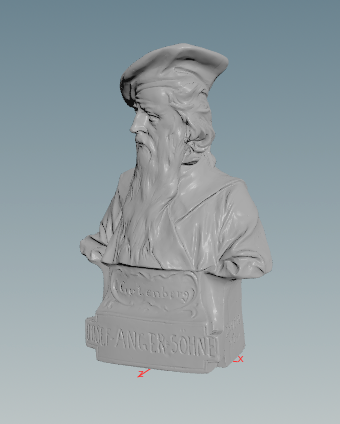
Newly exported asset. Now aligned with Y axis.
Woo awesome we can now proceed to test the turntable HDA. And here what we get:

Boom! Oh yas! We are almost there for this part II.
After the “Rop Fetch”, create a “Wait For All” node which will until all the frames are rendered and combine them into one “partition”.
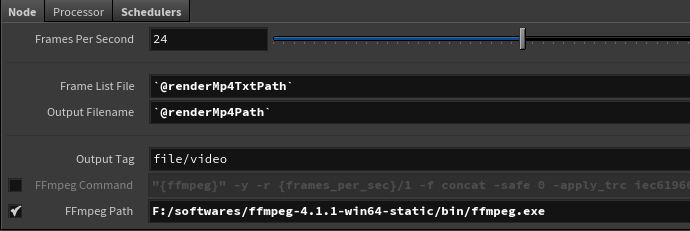
We will create a mp4 file with all those images. Which is pretty easy. Just put down a “FFmpeg Encode Video” node and put those values:
There are a few new things first, the variables @renderMp4TxtPath and @renderMp4Path don’t exists yet. We will need to update the “Python Script” “get_name” node to create them. Replace these line:
# computing the renderPath
renderPath = assetRenderPathTemplate.format(**pathValues)

# assigning the renderPath to the work item's data
work_item.data.setString("renderPath", renderPath, 0)
With those:
# computing the renderPath
renderPath = assetRenderPathTemplate.format(**pathValues)

# update the frame key to create a new path
pathValues['frames'] = ''
pathValues['extension'] = 'mp4'
renderMp4Path = assetRenderPathTemplate.format(**pathValues)

# update again to create the log txt file
pathValues['extension'] = 'txt'
renderMp4TxtPath = assetRenderPathTemplate.format(**pathValues)

# assigning the renderPath to the work item's data
work_item.data.setString("renderPath", renderPath, 0)
work_item.data.setString("renderMp4Path", renderMp4Path, 0)
work_item.data.setString("renderMp4TxtPath", renderMp4TxtPath, 0)
We are creating the mp4 in same folder as the where the frames where rendered.
The second new thing here is the path to ffmpeg.exe. I have it set here because I did not added it to PATH on my windows machine. Which I don’t really mind to have. If you don’t have it installed yet you can get it here. It’s more a unzip than a real installation. Once it’s unzipped you can point that location in the “FFmpeg Path” parm.
Let’s re-run the all graph so we get the attributes.
Really nice. Alright let’s add the last nodes
1 “Python Script” clean_ouput
1 “Remove File” clean_files
1 “Python Processor” stop
1 “Merge”
Like so:
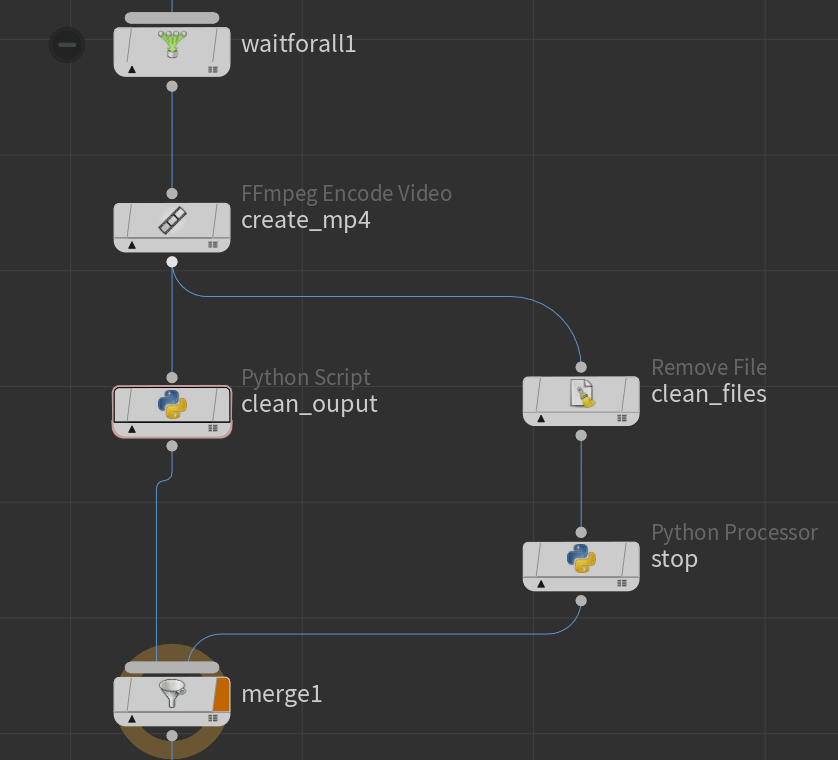
This includes the ffmpeg and waitforall nodes previously created.
In the “clean_output” code section put this code:
# we will need that one to parse the file path
import re

# storing some value before cleaning
images = work_item.data.stringDataArray('inputimages')
output = work_item.data.stringData("outputFilename", 0)
inputAsset = work_item.data.stringData("assetPath", 0)
assetName = work_item.data.stringData("assetName", 0)
version = work_item.data.stringData("version", 0)

# cleaning the attributes
work_item.data.clearStringData()
work_item.data.clearIntData()
work_item.data.clearFloatData()

videoPath = ''

# we get the mtime from the frames
# the parent's input result data is the list of frames
# we just need the last one
mtime = parent_item.inputResultData[-1][2]

# we get the parent's result data ( per work item )
for r in parent_item.resultData:
    videoPath = r[0]
    work_item.addResultData(r[0], r[1], r[2])

# we find the the frame number
pattern = r'\.([0-9]{4})\.exr'
m = re.search(pattern, images[0])
path = images[0]
if m:
    # if found we update the path string
    path = path.replace(m.group(1), "#"*4)

# we add result data to the current item
work_item.addResultData(path, parent_item.inputResultData[0][1], mtime)

# we re create attributes based on the stored values
work_item.data.setString("inputAssetPath", inputAsset, 0)
work_item.data.setString("assetName", assetName, 0)
work_item.data.setString("version", version, 0)
work_item.data.setString("outputAssetVideoPath", videoPath, 0)
work_item.data.setString("outputAssetImagesPath", path, 0)
Quite similar to the previous part. We clean the “work item” and keep what we will need for the final part.
On the “clean_files” “File Path” parm put this link:
`chs("../render_turntable/externalhip")`
We are removing the created scene from the “HDA Processor” node.
The “stop” node is just there to not pass down the “work item”.
And done! that’s it for the second part! Pretty cool hey. Let’s go to part III and we will look into how to push that to shotgun.
![tenor[1].gif](https://images.squarespace-cdn.com/content/v1/56ad815a40261d6ca1fc7d4a/1560655566937-08Q5U3FT7TRBQKOBK8WL/tenor%5B1%5D.gif)