
Hello! And welcome to the third and final chapter of these series. In this section we will look into how we can push everything to shotgun. From creating/finding an asset to submit a daily and attach it to the asset.
setup shotgun: WEb
Before we get started with the nodes in shotgun we need to do a bit of setup.
Now shotgun is definitely not free. And could be quite expensive for one person in the long run depending on how much one would use it.
However since it’s quite an industry standard, I thought it would be good to try in this tutorial. There is a 30 days trial for free which is more than enough to do this section.
Once you have signed up. We will create a new project: tops.
Alright on the main page. You should see a list of pre-created projects. If you don’t go to the “projects” menu and select “View All Projects”.

Click on the “+ Project” button. Select “ Film Template” and enter the project name: tops

Once the project is created, click on the on the name. That should direct you to the project page. You will pretty much have an empty page with some basic info on the right side.

The Id field is important to have. We will check against it later.
Awesome shotgun is setup on the web side! We need to setup it on houdini/python side.
setup shotgun: houdini/python
First let’s do it for python. You need to download shotgun api in order to use it with houdini. You can get it here. A simple pip install should work.
Alright that’s it. You can restart houdini and you should be able to import the main module ( or wait until we do the next part ):
![rKRsPJyoTt[1].gif](https://images.squarespace-cdn.com/content/v1/56ad815a40261d6ca1fc7d4a/1560665293734-XUE3RGN8EZP2LKMGAUOM/rKRsPJyoTt%5B1%5D.gif)
Nice! Note it might take some time to import the module. Mine was fast because it was already cached.
Let’s do on the houdini side. Even though we can import the module. TOPs still require some small things to work properly.
Pretty easy to do though. Let’s go back to the pythonrc.py file and add these lines:
os.environ["PDG_SHOTGUN_LOGIN"] = "YouLogin"
os.environ["PDG_SHOTGUN_PASSWORD"] = "YourPassword"
The login can be found in the accounts settings menu. It can be found in the top right corner.
![82RieMwbVC[1].gif](https://images.squarespace-cdn.com/content/v1/56ad815a40261d6ca1fc7d4a/1560745363461-QKXNNBILJJEEBZNV119T/82RieMwbVC%5B1%5D.gif)

Once this is done you can restart houdini.
creating the shotgun network-
Find project and check version:
Cool! let’s start creating the shotgun nodes now.
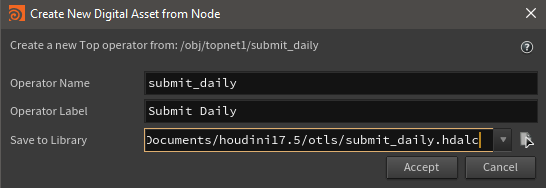
In the network create a digital asset from a subnet:
Then create our first shotgun node: Shotgun Session. This node will be needed to do all our queries and submissions down the graph.
Put the “shotgun Url” should be something like:
https://projectjulien.shotgunstudio.com
If you did the previous part properly, you should be able to connect to shotgun.

As you can see, a background Hython process is launched.
Nice we have now access to shotgun. One thing that is a bit annoying, is, every time you cook a node down stream it will launch that hython process. Which might feel a bit slow. This is fine when you cook the all tree as it will only do that once.
Next put down a “Shotgun Find”. So we can retrieve the project we want to daily to. Update the parms like so:

The “Entity Type” is what we want to find. Here a “Project”, and we want to find it “By Name” and the name will the environment variable “JOB” we set previously.
![mtfpNLDsCQ[1].gif](https://images.squarespace-cdn.com/content/v1/56ad815a40261d6ca1fc7d4a/1560926667678-0QKOB340FQJHCFW3MZMR/mtfpNLDsCQ%5B1%5D.gif)
The returned “id” for the found project is 89. The same value as shown in the previous section. Which mean it’s working properly and it found the right project. The value will be different on your side. As long as the values matches it’s fine.
Noice. Moving on with two “Python Script” nodes. One is just to get the project id into an attribute. And the other one will be to compare the version.
Right so first one:
# we get the parent item's result associated
# with the tag shotgun/find_entity_dict
rTempList = parent_item.resultDataForTag("shotgun/find_entity_dict")

# Assigning a default value to id
id = 0

# for each result data found
for val in rTempList:

    # we get the first one
    # the second one is the last modified val
    # which is useless here
    dictStr = val[0]

    # we create the dictionnary from the string
    rTemp = eval(dictStr)

    # we compare the value from the key 'type'
    # if it's equal to project
    # we get the project's id
    if rTemp.get("type", '') == "Project":
        id = rTemp.get("id", 0)

# we set the id variable to an attribute
work_item.data.setInt("projectId", id, 0)
We store the value into an attribute as the “Shotgun Find” node output it’s values to resultData. Which is a bit volatile and also harder here to get. So storing in an attribute will be easier to use down the line.
Now the second one:
# we set the id variable to an attribute
work_item.data.setInt("projectId", id, 0)


# getting the version number
version = work_item.data.stringData("version", 0)

# assigning a default value
exists = False

# if version is different than
# v001 then asset exists and change to True
if version != "v001":
    exists = True

# exporting the value to 'assetExists' attribute
work_item.data.setInt("assetExists", exists, 0)
fairly straight forward code here.

The version checking is a bit cheeky. We only check the file system version and not if it exists in shotgun. Which we should. But the “Shotgun Find” node fail and stop the graph if it does not find the asset. That makes it quite hard after to make it work. I’ve tried a few things, even with the “Error Handler” node. But that just did not work for me. So for now we will just check the version on disk.
Use the version to trigger different graphs:
Awesome, now that we know if it exists or not we can go two different path. Either we create the asset in shotgun or we find it. If we tried to always create the asset, we would end up with duplicates. Which is normal, as shotgun will create a new “id” for each “create” that is sent. So even if it’s a duplicate for us, for shotgun it’s not. It’s just two different entities with two different “id” but with the same label.
Ok let’s continue. Put down a “Split” node followed by “Shotgun Find” on the left and a “Shotgun Create” on the right. then “Merge” those two nodes together.

the “split node” allows us to push the graph into one direction based on a expression. On that node put the expression: @assetExists which will trigger the left graph if True or the right one if False.

get_asset parm UI
Same as for finding the project. We look for a type “Asset” with it’s code, which is the asset name. Because shotgun. And then we ask for an extra field on return. Which is the code. So we can compare the value. Otherwise we would only get the “type” and “id”.

create_asset parm UI
We put the expression @projectId in the parm “Project Id” to reference the project we want to create the asset in. And we specify two fields. First the “code” which is the asset name. Then the “sg_asset_type” which is the category. Here “Character”.
Now since we have been creating versions. It will think the asset already exists and fail to retrieve it.
![wiLuszQBWY[1].gif](https://images.squarespace-cdn.com/content/v1/56ad815a40261d6ca1fc7d4a/1560929037083-JXE80LA9JGYPGNIN53ZI/wiLuszQBWY%5B1%5D.gif)
For testing purposes let’s invert the result on the “split_exists” node.
![U8V1HjEkUy[1].gif](https://images.squarespace-cdn.com/content/v1/56ad815a40261d6ca1fc7d4a/1560929172653-H0ERU449N7X7GYP367O0/U8V1HjEkUy%5B1%5D.gif)
Cool looks like it worked! Let’s check on the Shotgun Asset page.
![RLXA96vCGs[1].gif](https://images.squarespace-cdn.com/content/v1/56ad815a40261d6ca1fc7d4a/1560929318689-EEKHRF4GUP5BK57TXZ8M/RLXA96vCGs%5B1%5D.gif)
Hot Damn! The asset has been created! woop!
Gather Information and submit:
Almost there!
We need just a few more nodes. First another “Python Script” to store the asset “id”:

Asset Id in shotgun. Under Asset Info.
# init some variables
projectId = 0
id = 0

# get the asset name on the work item
assetName = work_item.data.stringData("assetName", 0)

# get the result data with the tag 'shotgun/create_entity_id'
# from the parent item
r = parent_item.resultDataForTag("shotgun/create_entity_id")

# if r is not empty
# which mean the asset was just created
if r:
    # r is a list of tuple
    # get the first element of that list
    # and get the id
    id = r[0][0]

# if r is empty
# which means the asset already exists
# and we need to get the id that was found
elif not r:

    # we get the result data with the tag 'shotgun/find_entity_dict'
    # since there is already data like that type
    # the list will contain more than one tuple
    rTempList = parent_item.resultDataForTag("shotgun/find_entity_dict")

    # we loop through all the tuples
    for val in rTempList:

        # we get only the string dictionary
        dictStr = val[0]
        # we create the dictionary
        rTemp = eval(dictStr)

        # if the code key as the assetName as the value
        # we get the 'id'
        if rTemp.get("code", '') == assetName:
            id = rTemp.get("id", 0)

# exporting the found id to 'assetId'
work_item.data.setInt("assetId", int(id), 0)
This code allows us to get the id from both side of the graph.

Sorry for the UI. It got too big from the script :)
Ok! now what we want is to create the version and upload the mp4 file. Create a “Shotgun Create” node and fill these parms:

Same as before we use the @projectId attribute to associate with the project. We want to create a “version” so we put “Version” as the value.
The “code” field is the name for the version. The “description” is self explanatory.
“sg_path_to_movie” will provide info on where the mp4 is stored on disk.
“sg_path_to_geometry” will provide info on where the asset is stored on disk.
“sg_path_to_frames” will provide info on where the rendered frame are stored on disk.
Then we go the next tab and add an extra field:

This will give us a way to associate that version to found or created asset. This should be a python expression. pdg.workItem() returns the current work item. Then we get the “assetId” attribute from that work item.
![MhJaKbrQRk[1].gif](https://images.squarespace-cdn.com/content/v1/56ad815a40261d6ca1fc7d4a/1560999237468-FBZJFQ01YKNLG2J46IFS/MhJaKbrQRk%5B1%5D.gif)
This gives us this:
![fxCEqkI2uR[1].gif](https://images.squarespace-cdn.com/content/v1/56ad815a40261d6ca1fc7d4a/1560999344696-C55IPVNON9BDI42FZO09/fxCEqkI2uR%5B1%5D.gif)
Don’t worry if you have a different version number. I’ve been testing in between session so it might not match. The essential is that it works. Which it does!
You should be able to see all these info attached to that version. Alright the last node, create a “shotgun Upload” node with these:

the file is given by the attribute @outputAssetVideoPath. We make sure to set the “Entity Type” to “Version” and finally the “Field Name” will be “sg_uploaded_movie”. This last one comes from the the HDA “Shotgun New Version” which pretty much does the same as the last two nodes. Except it does not allow to attach the version to an asset.
![JwesflaY6j[1].gif](https://images.squarespace-cdn.com/content/v1/56ad815a40261d6ca1fc7d4a/1561007046219-SUKH1025CCLY7ASOEFA8/JwesflaY6j%5B1%5D.gif)
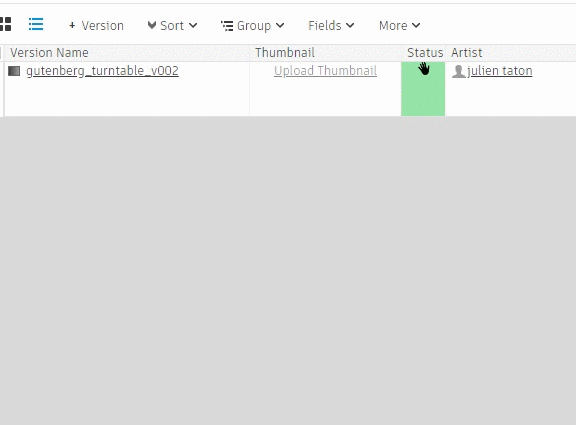
It might take some time before you can see the Thumbnail updated properly.
Ok! so we have our daily now! woohoo!
Let’s go back to our root folder and delete the all project. Also make sure to go back on the “split_exists” node and turn off the “Invert Selection” option. And last thing, go on the “Assets” page in shotgun. Select the “gutenberg” asset then right click and select “Send Selected Asset to Trash”. It will ask you to confirm. Click “Ok” and you will have an empty page.
![32QeNY4iCY[1].gif](https://images.squarespace-cdn.com/content/v1/56ad815a40261d6ca1fc7d4a/1561007826401-9DTWBUGM1OXQLRPK1OVZ/32QeNY4iCY%5B1%5D.gif)
On the “tops_turntable” HDA update the frame range to 1-48. End lastly dirty the first HDA.
Run the entire process…
![L4tQPUMUnV[1].gif](https://images.squarespace-cdn.com/content/v1/56ad815a40261d6ca1fc7d4a/1561008786369-ZYYABZLKD3BXHRUNG8LZ/L4tQPUMUnV%5B1%5D.gif)
![aXNnjhinhP[1].gif](https://images.squarespace-cdn.com/content/v1/56ad815a40261d6ca1fc7d4a/1561009917043-BEMFURBYXHB8ZQWAN5WE/aXNnjhinhP%5B1%5D.gif)
Boom! we have now a full working process from decompress to daily in shotgun. Isn’t this pretty damn cool hey?
conclusion:
This conclude this series. This was definitely a big one. It was really interesting and sometimes frustrating too, to look into that aspect. Hope you learned a thing or two. These are just pointers to what you can do. It is not a full robust solution but a mere presentation what can be achieve.
here are all the files produced by this tutorial.
![1536411200_tumblr_nwfxl5SHir1ujuk5ho1_540[1].gif](https://images.squarespace-cdn.com/content/v1/56ad815a40261d6ca1fc7d4a/1561012373611-YH4ELNWPX7XNG5WGPF7G/1536411200_tumblr_nwfxl5SHir1ujuk5ho1_540%5B1%5D.gif)